
Assets are the images, .swfs, and movies that are used in your presentations and are uploaded and listed in the Content/Assets Management tab. Asset Management is basically a storage unit for keeping all of the assets that are used or may be used in your presentations. The Asset Management window includes properties such as width, height, date created, and date updated.
Assets are used in your presentation by dragging and dropping Image, Movie, or Playlist Widgets into a presentation or by adding them to a Catalog Item used in a custom layout using the Create New Catalog Item procedure. See Using Catalog Management for more information.
![]()
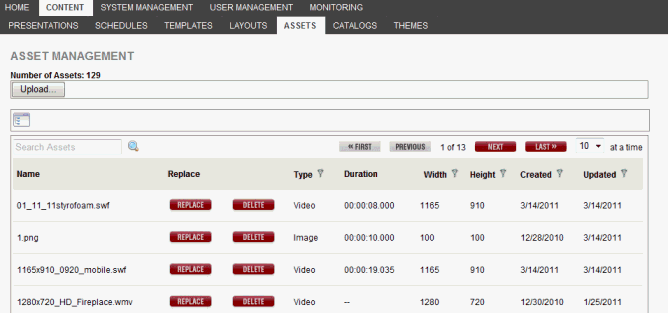
In this window, you can do the following:
■ Upload a new image, movie, or .swf file.
■ Replace a current image, movie, or .swf file.
■ Delete an image, movie, or .swf file.
■ Search for an asset by entering the file name or the first few characters in the Search field and pressing Enter or clicking the magnifying glass.
■ You can click any column head to sort the assets in ascending or descending order by the information in the column.
For Example: To sort in ascending order by asset name, click the Name column head. An up arrow appears next to the column head. If you click the column head again, a down arrow appears and the assets are sorted in descending order by name.
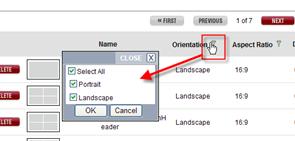
■ Click
a Filter icon ![]() to
open a list of options in that list to select or deselect and filter down
the list.
to
open a list of options in that list to select or deselect and filter down
the list.
■ View the asset by clicking the Name of the asset in the Asset Management tab.
Each tab under the Content
tab displays a Folder Navigator icon  providing
the opportunity to access the folders you have created in your RoninCast
system. See Using Folder Management
for information on creating new folders.
providing
the opportunity to access the folders you have created in your RoninCast
system. See Using Folder Management
for information on creating new folders.
To use the Folder Navigator:
1. Click the Folder Navigator icon . The
Root of the folders displays.

2. Click the arrow to expand the Root.
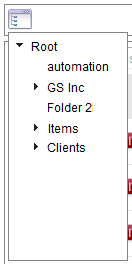
3. Select a folder. A drop-down list appears next to the Root drop-down box.

4. Click GO to open the list or to present another sub-folder drop-down list.
|
Naming Convention Best Practices (Click to open) |
1. Click the Content/Assets tabs in RoninCast.
2. Click Upload at the top of the Assets Management page. The Upload Files window appears.
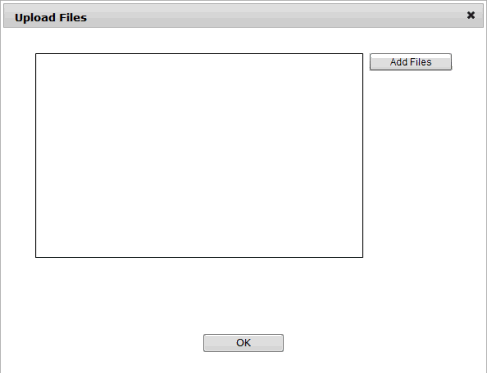
3 Click Add Files. The Select files to upload window appears.
4. Select the appropriate Files of type from the drop-down list, e.g., Audio Files, Icon Image Files, or Video Files.
5. Select the file(s) and click Open. The Upload Files window with a progress bar for the file appears.
TIP: Using the Ctrl key, multiple files can be selected to upload into the Assets list.
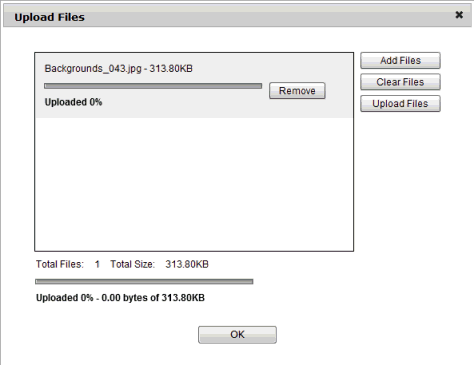
6. Click Upload Files.
NOTE: The file uploads can be removed by clicking Clear Files.
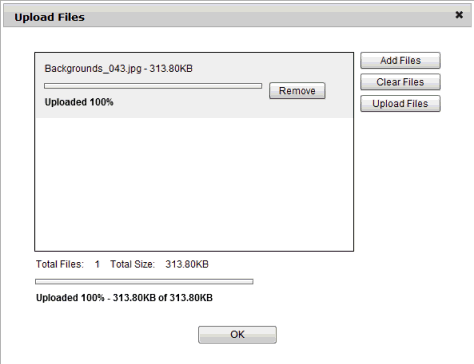
7. Click OK. The uploaded assets now appear in the Asset Management page and are available to be added to presentations.
Assets no longer needed can be deleted from the system.
1. Click the Contents/Assets tab.
2. Locate the asset in the list either by scrolling through or using the Search Assets function.
3. Click Delete next to the asset. The system searches for uses of the asset in the site. If the asset resides in a presentation, schedule, and player, a Dependency List appears.
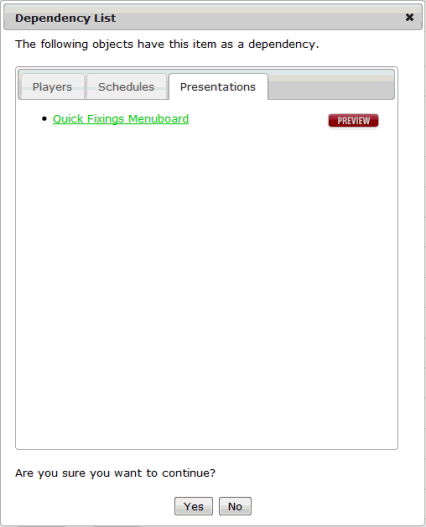
4. Click Yes if you want to continue. Removing this asset from the list will remove it from anything listed in the Dependency List. See the next topic on Deleting Assets Still in Use.
If an asset is still being used in a presentation, you may get a message stating that they cannot be deleted.
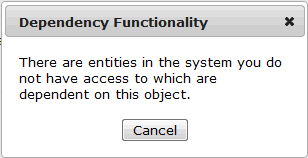
If you know that these assets are no longer needed, you can find out where they are being used and remove them from the presentation. Then they will be ready to delete.
To locate and remove asset from presentations:
1. Click Delete on the asset in Assets tab. If a Dependency List pops up, it will list the presentations where this asset is located.
2. Click the link to that presentation and remove the asset:
a) For assets within a layout: Select the zone. Locate the catalog item below the presentation, click the Change Image button, and replace that image with another image.
b) For assets not in a layout: Click the zone, then click Edit Image, Edit Movie, or Edit Playlist. Replace image with another image, remove from playlist, or click clear zone.
3. Click Save in the presentation.
4. Click Delete next to asset in Assets tab.
Assets can be replaced with updated or different images, movies, or .swf files.
IMPORTANT: This process will replace the old asset with whatever asset is uploaded and everywhere the old asset was being used will be replaced with the new asset. It is a global replace. If that is not a desired outcome, the Replace button should not be used.
To globally replace an asset with a new asset:
1. Click Replace next to the asset to be replaced.
A Dependency List appears if asset is currently being used:
The Dependency List tells you if any schedules, Presentations, or Presentations would be affected by this replacement.
2. Click Yes to proceed with replacement process. Click No to cancel.
3. Select a destination folder for the new asset.
4. Use the steps in Adding a New Asset to upload a new asset.
Once the file is uploaded, the old asset is replaced with the new asset whereever that asset was located.
NOTE: The old asset is no longer in your system. It can be re-uploaded and be available for future use.
