After the template and layout(s) are created for the presentation, the text and images of the presentation are entered into Catalog Items. The Catalog tab is where you create Catalog Items for your Presentations, e.g., images, movies, headers, price lists, menu items, etc. These catalog items are just data without any formatting applied to them. Formatting is applied when creating a Layout using themes. Catalog Items are only used when a layout is used. See Using Theme Management
See Catalog Item Strategies and Guidelines
See Determining the Correct Item Type in Catalog Item Creation
![]()
Catalog Item Strategies and Guidelines
There are a variety of ways to structure your catalog items. Here are some things to consider when planning your catalog items.
■ There can only be one image in a catalog item.
■ If one catalog item will be present on several different presentations and you change a price or content, it will ripple out to everywhere it is located. If that is not a desired outcome, create separate catalog items for different presentations and be sure to use naming conventions that will help identify them correctly in the future. See Creating Cycle Menus.
■ Catalog item details (each piece of text - price, header, description, etc.) should be created in logical groupings, however, if each menu item in a Sides menu includes an icon image, each line has to be a separate catalog item because of the one image per catalog item limitation. These groupings should match the Layout Groups set in the layout.
■ Catalog items need to be created for background images that will be displayed behind zones using layouts. Background images going to be displayed behind zones that are populated via the Image, Movie, or Playlist widgets do not need to be in a catalog item. They can be added to the presentation using the Image, Movie, or Playlist widget.
■ Catalog items can be updated or edited from either the Catalogs tab or directly in the presentation. See Editing an Existing Presentation.
■ When editing several catalog items at a time, update them within the Catalogs tab and not each presentation in which they are located. This is not required but will be more efficient.
■ When creating new catalog items, use existing catalog items as templates to ensure the correct Item Types are used. See Copying a Catalog Item.

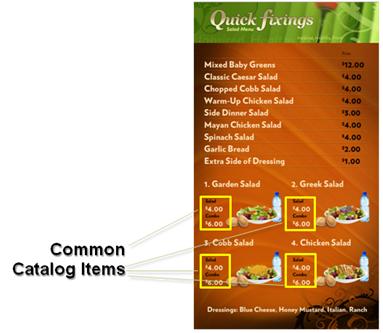
Quick Fixings Example (click to open)

Click the Content/Catalog tab to see the following window, which is where you will access your existing catalog items or create new items.
In this window, you can do the following:
■ Click Create New Catalog Item to create a new catalog item.
■ Click Copy to copy the catalog item.
■ Click Edit to edit the catalog item.
■ Click Delete to remove the catalog item permanently.
Each tab under the Content
tab displays a Folder Navigator icon  providing
the opportunity to access the folders you have created in your RoninCast
system. See Using Folder Management
for information on creating new folders.
providing
the opportunity to access the folders you have created in your RoninCast
system. See Using Folder Management
for information on creating new folders.
To use the Folder Navigator:
1. Click the Folder Navigator icon . The
Root of the folders displays.

2. Click the arrow to expand the Root.
3. Select a folder. A drop-down list appears next to the Root drop-down box.

4. Click GO to open the list or to present another sub-folder drop-down list.
New images, movies, text, and .swf files are entered into software for use in Presentation through the Create New Catalog Item button.
|
Naming Convention Best Practices (Click to open) |
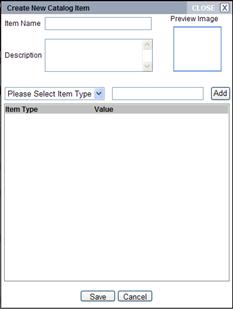
1. Click Create New Catalog Item.
The following window appears:
2. Select a folder in which to place the new presentation. The following window appears:
NOTE: For more information about Folder Management and creating new folders, go to Using Folder Management.
IMPORTANT: If a folder is not present under the Root, a folder will need to be created under Folder Management before an object can be created.
|
Create/Edit Catalog Item form with callouts (Click to open) |
3. Enter an Item Name.
4. Enter a Description that will provide details about the content of this Catalog Item. This field is optional.
5. Select an Item Type from the drop-down list. To add an image, select "IconImage" from the drop-down list.
NOTE:
Catalog Item Types are directly
tied to the Layout which determines the precise placement of the text
and/or image. When the Layout was created, Item Types were assigned to
each layout item detail (zones in the layout). This same Item Type must
be used in the Catalog Item creation.
To determine the Item Type used in the Layout see Determining
the Correct Item Type in Catalog Item Creation.
TIP: To customize the names of the Item Types, see Customizing Catalog Item Types.
6. In the text field to the right of the drop-down list, enter the text that will be on the display and click Add. The Assign Image window appears which is from the Asset list.
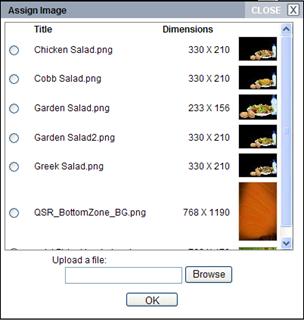
7. Select a file in the list or Upload a file using the Browse button.
8. Click OK. The selected image is displayed in the Preview Image box.
9. At this point you can click Save or you can add more items under this same catalog item.
10. Continue adding text items into this same catalog item based on how the layout was set up. See Determining the Correct Item Type in Catalog Item Creation for information on how to know how catalog item details are grouped in your specific situation.
11. To add another item, select an Item Type.
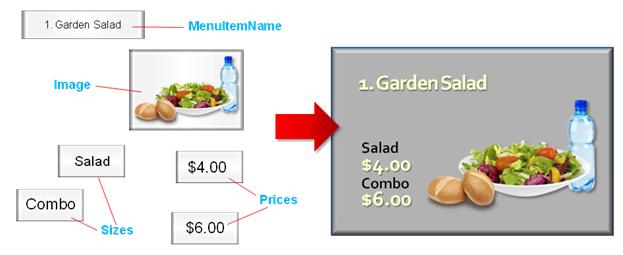
12. Enter the text for that Item Type. For example, if you selected “Header” as the Item Type, enter “1. Chicken Salad."
13. Click Add. The header is added to the list.
14. Add more items (According to how the layout was created and items were grouped. See Determining the Correct Item Type in Catalog Item Creation) or click Save if you are finished.
TIP: If your Catalog Items do not appear when assembling the presentation, they may have the wrong Item Type assigned to them. See Determining the Correct Item Type in Catalog Item Creation to determine the correct Item Type.
NOTE: The Data Integration checkbox is only used when external data is used to populate catalog items. For more information, contact training@wirelessronin.com.
Item Types for text and images in Catalog Items have a 1-to-1 relationship with the layout created for the exact placement of that text and images. If the Item Types between the Catalog Items and its corresponding layout do not match, your text will not show up in the presentation.
The Item Types are determined in the layout which may have been created by another party. Even if you don't have access to the layouts in the Layouts tab, you can find out the Item Type by looking in the Layout Widget Configuration. You can also determine if there is more than one group of Catalog Item Details in the layout which will help you know what should and should not be included in each catalog item.

To determine what the correct Item Types should be:
1. Open the presentation in Presentation Management.
2. If the zone has already been populated with a layout:
a) Click the zone once so that a red outline appears.
b) Click the Change Content button below the presentation. The Layout Widget Configuration page with the Preview Layout tab displayed.
3. If the zone is empty:
a) Drag
the Layout Widget  to the zone and drop it. The Layout Widget Configuration page
opens.
to the zone and drop it. The Layout Widget Configuration page
opens.
b) In the Select Layout tab, select the appropriate layout. The Preview Layout tab appears.
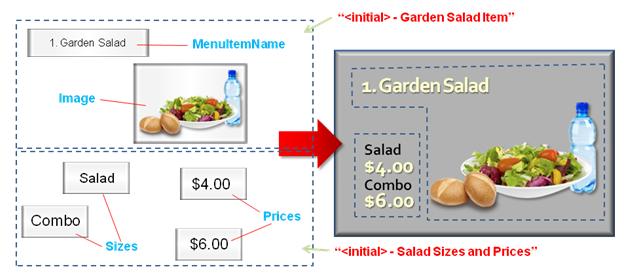
4. Hover the cursor over each zone in the layout on the left side of Configuration window. The tool tip will display the name of the Catalog Item and the name of the Layout Group, i.e., "MenuItemName; Group: JB - Garden Salad."
As you hover over each piece of text outlined in black (layout item details), you can identify which items belong together in a catalog item. For example: The layout item detail highlighted below belongs to the group "JB - Garden Salad."
When you hover over the word "Salad," you can see the Item Type listed first (MenuItemSize1) and then the Group it belongs to (JB - Salad Price and Size). As you would hover over "$5.00," "Combo," and "$6.00," you would see different Item Types but the same Group -- "JB - Salad Price and Size."
This tells you that the four items: "Salad," "$5.00," "Combo," and "$6.00," should all be in the same catalog item. The title of the combo, "1. Chicken Salad" and the image would be in the second catalog item.
In the following image, the two groups identified in the Preview Layout tab are also located in the Choose catalog item for drop-down list. The steps for populating a layout are located in: Adding Custom Layouts to a Presentation Zone. Once you create the two catalog items, or whatever your layout indicates, then you can assemble your board.
5. If a catalog item or items have already been created for this layout, you can use them as templates. Find the correct catalog item under the Catalogs tab and use the same Item Types.
Existing Catalog Items can be edited, such as changing a price or rewording a header. A different image can be selected as well. Catalog Items can also be edited within the Presentation Management page. See Editing an Existing Presentation for more information.
To edit a catalog item in the Catalogs tab:
1. Click Edit.

The system processes the access rules and dependencies.
It checks if your access settings include viewing, updating, or deleting the selected catalog item. If you are not permitted to open this catalog item, a message will appear stating such and the catalog item will not open.
It also checks where this catalog item is currently being used. If it is being used a Dependency List appears with the Players, Schedules, and Presentations tabs if the presentation has been scheduled and assigned to a player.
All presentations listed in the Presentations tab of the Dependency List have a Preview button which opens a preview of the presentation without leaving the page.

Each tab will list all of the items that would be affected if the catalog item was edited in any way.
If you are sure that this catalog item can be viewed and/or edited, click Yes and the Edit Catalog Item window appears.
2. To edit a text item, click Edit.
The editor appears.
3. Edit the text as needed and click Save.
4. Edit other catalog item details as needed and click Save.
NOTE: Images in catalog items are edited differently. See Editing Images in Catalog Items.
Editing images in catalog items is a different process than editing text.
To edit an image in a catalog item:
1. Open catalog item by clicking the Edit button in the Catalogs Management tab.
2. Click Delete next to the catalog item detail with the Item Type of Icon Image.
3. Select Icon Image from the Please Select Item Type drop-down list.
4. Click Add to open the Assign Image window.
5. Select new image and click Save.
6. Click Save in the Edit Catalog Item form.
Existing Catalog Items can be copied and given a new name.
1. Click Copy.
The following window appears (specific to each site):
2. Select a folder in which to place the new presentation.
3. Enter a new Catalog name.
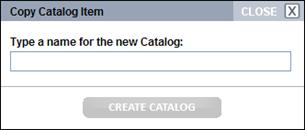
4. Click Create Catalog. The item is added to the catalog list under the new name.
Catalog Items can be permanently deleted from the catalog list when they are no longer needed.
To delete catalog items:
1. Click Delete.
2. Click Yes to the confirmation message.
The item is removed from the catalog list.
If a catalog item is still being used in a presentation, you may get a message stating that it cannot be deleted.
If you know that these catalog items are no longer needed, you can find out where they are being used and remove them from the presentation. Then they will be ready to delete.
To locate and remove catalog items from presentations:
1. Click Edit on the catalog item in Catalogs tab to open. If a Dependency List pops up, it will list the presentations where this catalog item is located.
2. Click on the link to that presentation and remove the catalog item by clicking the Change Content button and replacing that catalog item with another catalog item. Click Save in the presentation before navigating to the Catalogs tab..
3. Click Delete next to catalog item in Catalogs tab.