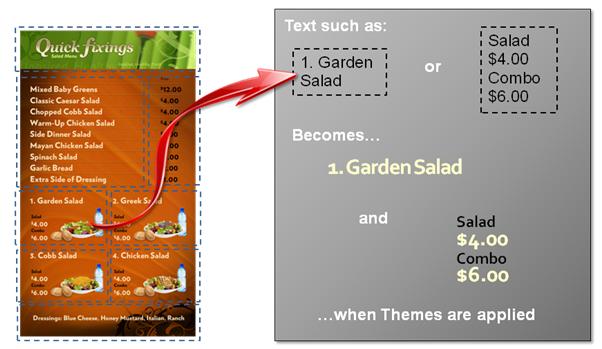
The text that was entered into the Catalog Items is raw data without any formatting applied. It is in the Themes Management tab that you create the formatting for all of the text areas of your presentation. You can quickly and easily format your text to give it a consistent look by applying a theme.
A theme is a set of formatting choices that include a font family, sizing, coloration and justification, effects such as drop shadow, glow and bevel, as well as character and paragraph spacing.
The themes are applied in the layout to each layout item details (blue zones in layout) containing text.
Themes Strategies and Guidelines
■ If you have access rights for creating themes, create three or four different sizes of the same theme to enable you to adjust the theme as you are assembling the presentation, if needed.
■ If creating prices, use the alignment feature to give the price a right justification, if appropriate.
■ To learn about hexidecimal colors, if desired, go to: www.mathsisfun.com/hexadecimal-decimal-colors.html or Google "hexidecimal colors."
■ Use the recommended Naming Conventions for clarity and ease of searching in the future. See Themes Naming Conventions.
See Themes Strategies and Guidelines
![]()

The Themes tab is where you create and store the customized themes for your Presentations.
Click the Content/Themes tab to see the following window, which is where you will access your existing themes or create new themes.
In this window, you can do the following:
■ Click Create New Theme to create a new theme.
■ Click Copy to copy the theme and reuse under a different name.
■ Click Edit to edit the theme.
■ Click Delete to remove the theme permanently.
■ Search for existing themes.
Each tab under the Content
tab displays a Folder Navigator icon  providing
the opportunity to access the folders you have created in your RoninCast
system. See Using Folder Management
for information on creating new folders.
providing
the opportunity to access the folders you have created in your RoninCast
system. See Using Folder Management
for information on creating new folders.
To use the Folder Navigator:
1. Click the Folder Navigator icon . The
Root of the folders displays.

2. Click the arrow to expand the Root.
3. Select a folder. A drop-down list appears next to the Root drop-down box.

4. Click GO to open the list or to present another sub-folder drop-down list.
|
Naming Convention Best Practices (Click to open) |
New themes can be defined in the Themes tab.
1. Click Create New Theme.
The following window appears:
2. Select a folder in which to place the new presentation. The following window appears:
NOTE: For more information about Folder Management and creating new folders, go to Using Folder Management.
IMPORTANT: If a folder is not present under the Root, a folder will need to be created under Folder Management before an object can be created.
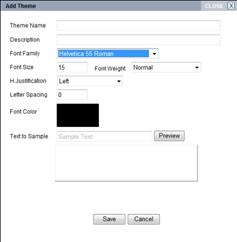
3. Enter Theme Name. Use a theme name that is logical and will be easy to locate at a later date.
4. Enter a Description. Use the description to add more clarity and instruction for this particular theme.
5. Select a Font Family from the drop-down list.
6. Select the Font Size.
7. Select the Font Weight: Normal or Bold.
8. Select the H.Justification: Left, Right, or Centered.
9. Select the Letter Spacing, if desired. "0" is the default and is normal spacing.
NOTE: Enter sample text in the Text to Sample field and click Preview if you want to see how the text appears with the text formatting properties you select.
10. Select a Font Color by clicking on the colored box. A color chooser window displays.
a. Drag the circle from the bottom left corner of the shaded box to change the color.
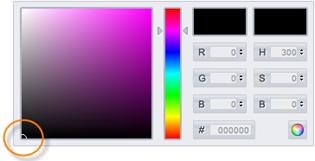
b. Click the multi-colored circle ![]() on
the lower right corner to close.
on
the lower right corner to close.
11. Click Save. The new theme is added to the Themes list in alphabetical order.
Existing Themes can be copied and given a new name.
1. Click Copy.
2. Enter new Theme Name.
3. Enter new Description.
4. Make changes to other formatting settings as desired.
5. Click Save.
Existing Theme properties can be edited.
1. Click Edit.
The system processes the access rules and dependencies.
It checks if your access settings include viewing, updating, or deleting the selected theme. If you are not permitted to open this theme, a message will appear stating such and the theme will not open.
It also checks where this theme is currently being used. If it is being used the following window appears with the Players, Schedules, and Presentations tabs:
Each tab will list all of the items that would be affected if the layout was edited in any way.
If you are sure that this layout can be viewed and/or edited, click Yes:
2. Make changes to any of the Theme properties.
3. Click Save.
Existing Themes can be permanently deleted from the system.
1. Click Delete.
2. Click Yes or No to the confirmation message.
Themes are applied to the text in the Layout tab after the layout item details have been created and grouped.
See Applying Themes to the Layout
