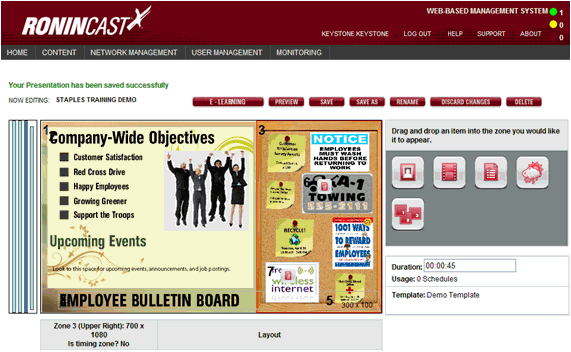
Presentations: A presentation is an assembly of images, text, and/or videos that will appear on the display. The presentation is essentially the container of the content that is scheduled and sent to the player.
The word “Presentation” can be used interchangeably with “menuboard,” “greeter board,” “infoboard,” etc.

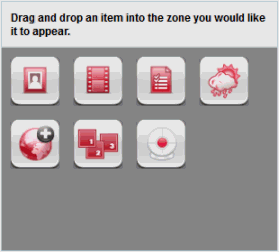
Presentation Widgets: A presentation is populated using widgets. These can be dragged and dropped onto the zones, whether already populated or empty, and opens appropriate settings for that widget.
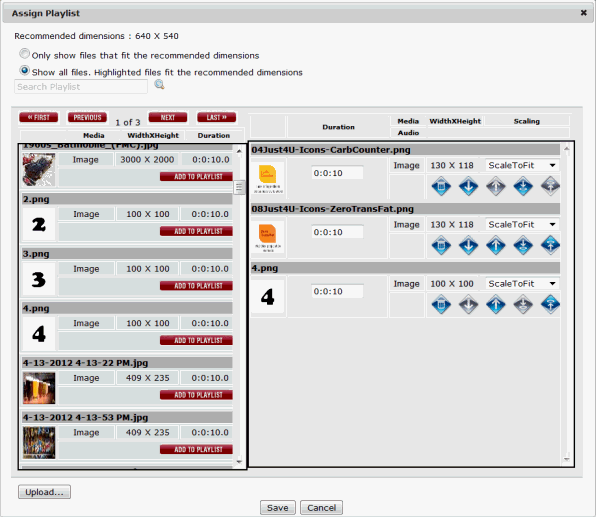
Presentation Playlist: A series of images and/or videos can be made into a playlist for a given zone in a presentation. The duration, order, and scale can be set for each item in the playlist. The playlist is added to a zone using the Playlist widget.
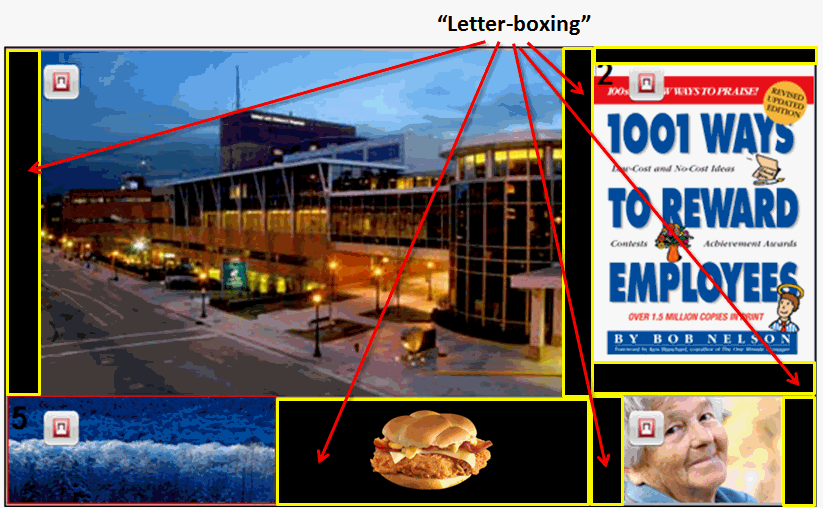
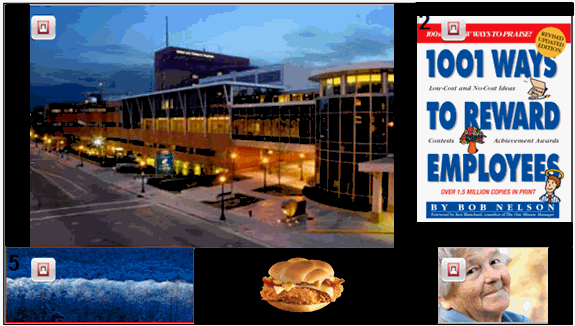
Letterboxing: Letterboxing is the black bars or background that appear where the image doesn't meet the boundary of the zone or an image with a transparent background, such as the sandwich below.
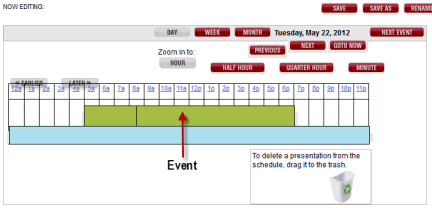
Schedule: A schedule is created in RoninCast to play the presentation on the display (monitor). The start and end dates and times are set and recurrences can be set, as well. Multiple presentations can be in one schedule and display according to dayparting and priorities if the schedule events overlap.
Event: Once a presentation has been dragged and dropped onto a timeline, it becomes an Event. The Configure Event window opens to set the dates, times, recurrences, and priorities. Presentation Playlists can be created within the Configure Event window to rotate between presentations on a display.
Priority: The priority setting in the Configure Existing Event window is used when two or more presentations overlap in the timeline. It determines which presentation will play during the time they overlap. See Creating a New Schedule, Step 11. If two presentations overlap and have the same priority, they will flip back and forth during the time they overlap. The duration that each presentation plays before rotating is set on the Presentation Editor page of each presentation. The Duration setting is located below the widgets.
Recurrence: The recurrence setting can be used to schedule a presentation for a determined length of time into the future. The most commonly used recurrence settings are Days and Weeks and the ending has a variety of options: Forever, End After (Count), or End by Date. See Creating a New Schedule, Steps 8-10.
Template: The template is the foundation of the presentation or board. It provides zones (areas) for different media to play as well as background images or animations. The mock-up of a board is separated out into logical zones outside of RoninCast and used as a guide in creating the template. Every presentation starts with a template.
The size of the template can be set according to the resolution of the displays as well as custom sizes.
Template Zone: A zone is an area created in a Presentation Template which will eventually contain content in the presentation. Examples of content are Images, Videos, Custom Layouts with Images, Text and Videos, Weather, etc. Zones can be layered and the depth and layer are determined by the Z-Index (see Creating a New Template, Setting Zone Properties) set in the template creation.
This zone appears as a box and is shaded in blue within the template builder. The zone will appear in the final template with the number indicating the order they were created.
Z-Index: The Z-Index is a setting from 1 to 10 which indicates the depth of the zone layer. A zone with a low Z-Index is closer to the back of the presentation and a zone with a higher Z-Index is closer to the user. The lower the number, the lighter shade of blue used for visual clarification of layers. Multiple layers of zones are possible (see Creating a New Template, Setting Zone Properties).
Presentation Zone: Once the presentation is created using the template, the zones created in the template appear in the presentation via the Presentation editor and are ready to be populated with content using the various widgets. The zones in the presentation are indicated with numbers, indicating the order they were created. When the mouse hovers over the zone, it grays out.
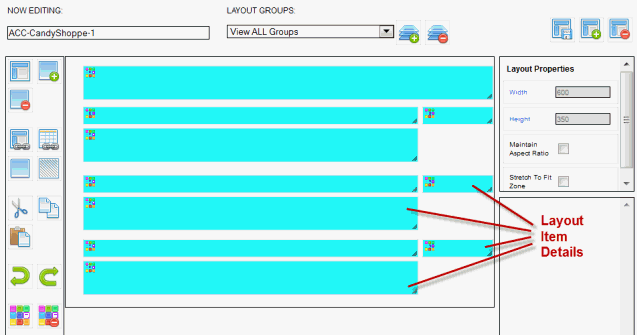
Layout: A layout is only used when dynamic text and/or images are used in a presentation zone. Dynamic text means it can be edited within RoninCast and is not part of an image. A layout, much like templates, uses zone-like boxes to give exact placement for text and images within template zones. The boxes in layouts are called layout item details (to distinguish them from template zones) and are shaded in blue. The outer dimensions of the layout should be the same dimensions as the template zone it is being created for, or smaller.
The layout is used after a presentation has been created using a template. The Layout Widget is dragged and dropped onto the presentation zone for which the layout was created. The Layout Widget Configuration window appears and the layout is selected. Then the process of populating the layout with the dynamic text and images (in the form of Catalog Items) begins. See Adding Custom Layouts to a Presentation Zone.
Layout Item Detail: A layout item detail is a box drawn in the layout editor that would eventually contain the text or image in a custom layout when the presentation is assembled. These layout item details will be assigned an Item Type which will directly correlate to the Catalog Item (dynamic text and/or images) created for this layout. They are also assigned a Layout Group which is used during the assembly of the presentation. Finally, each layout item detail designated for text will be given a Theme (text formatting) which affects only that layout item detail.
Item Type: An Item Type, in the context of a layout, is a designation given to a layout item detail that correlates it directly to the Catalog Item detail which is a piece of text and/or possibly an image. Possible Item Types are Header, Sub-Header, Description, Menu Item Name, Price1, etc. It is how the software knows which layout item detail in the layout should contain the header and which should contain a price or an image. Each layout item detail is assigned an Item Type using the Item Type drop-down list in the Layout Properties. See Setting Item Detail Properties.
Z-Index: A setting from 1 to 10 indicating the depth of the layout item detail layer when they overlap. An item detail with a low Z-Index is closer to the back of the presentation and an item detail with a higher Z-Index is closer to the user. The lower the number, the lighter shade of blue for clarification purposes. Multiple layers of item details are possible. This is the same functionality used in creating layers of zones in templates.
Layout Groups: A layout group is a required designation for each layout item detail in a layout that is used for assembling the presentation. A layout can have one or many layout groups within one layout depending on the complexity and the number of images. These groups are directly tied to the Catalog Item created for the layout and since only one image is allowed in a Catalog Item, then only one image can be in a layout group. The use of the layout groups is not evident when creating the layout but becomes clear when assembling the presentation in the Layout Widget Configuration window. Every layout item detail is automatically assigned the Default layout group and is sufficient if the layout will only contain one layout group. See Step D. Create and Apply Layout Groups and Five Main Steps for Creating Layout Groups.
Themes: A Theme is a set of formatting options that can be created for the text Catalog Item details that will be displayed in the layout. The options are: font, color, size, weight, letter spacing, and justification. The themes are created in the Themes tab and are applied in the layout creation process. See Step E. Apply Themes to the Layout.
Layout Widget
Configuration: When a presentation is created and a Custom Layout
widget is dragged and dropped onto a zone, the Layout Widget Configuration
window appears. The layout is selected in the Select Layout tab and then
appears in the Preview Layout tab unpopulated. The populating of text
and/or images in the form of Catalog Items begins.
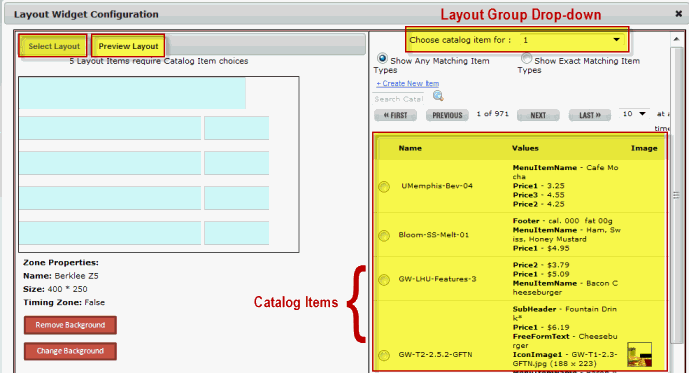
This is where the Layout Groups come into play. A layout group is selected
from a drop-down list in the right pane and the catalog item that should
populate that layout item detail is selected from the list of catalog
items in the right pane. The layout item details in the layout preview
that were assigned to that group will be populated with the catalog item
just selected. That process is repeated until every layout item detail
is populated, including the background image, if appropriate.
The 1-to-1 relationship mentioned in the Catalog Item section comes into play here as the Catalog Item Detail Item Types need to match the Item Types assigned to the Layout Item Details when the Layout was created.
Assets: Assets are any image, animation, or video that have been uploaded into RoninCast. Uploads can take place in the Assets tab, the Assign Playlist to Zone, or the Assign Image window. The Assets tab is the only location where multiple items can be uploaded at once.
Catalog Items: A Catalog Item is one or more text, image, and/or animation that will be displayed in a custom layout. They are entered using a Catalog Item form in the Catalogs tab.
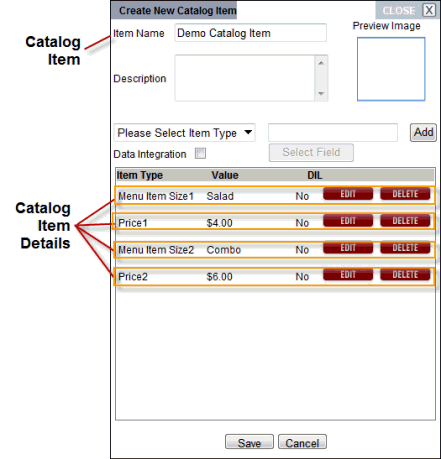
The details of the Catalog Item (pictured above) are called Catalog Item “Details.” There are two kinds of details, Text details and Image Icon details (for supported image and animations). Each “Detail” is assigned an Item Type (see Item Type section).
Item Type: An item type, in the context of Catalog Items, is a designation given to a value (image, animation, or text) in the Catalog Item that correlates directly to the layout item detail designated to contain that value. Possible types are Header, Sub-Header, Description, Menu Item Name, Price1, etc. It is how the software knows which layout item detail in the layout should contain the header and which should contain a price or an image. Each piece of text, whether it is a header or a paragraph, is assigned an item type using the "Please select Item Type" drop-down list in the Create New Catalog Item form.
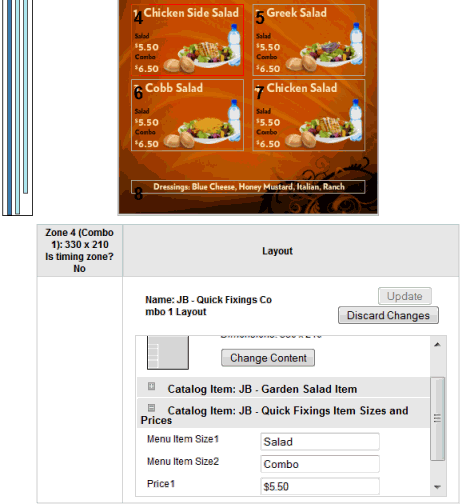
Catalog Item Editor: The Catalog Item Editor appears below the presentation when a zone containing a layout is selected. The Catalog Items can be edited by highlighting text and entering different text or deleting it. Images can be changed by clicking the Change Image button. The Update button is then clicked to see the changes in the presentation above the editor.
Display: A display is the monitor on which the presentation will be displayed in a kiosk, restaurant, coffee shop, store, dealership, lobby, etc.
Player: A small (or large, depending on the need) computer that is connected to a display (monitor). It is used to send the content of your board to the display.
Site: In the context of RoninCast, a site has a twofold definition. When a customer (car dealership, restaurant chain, retail store, etc.) is initially entered into RoninCast and given their own URL access to RoninCast, it is called a site.
A site is also created in Network Management where their players are assigned. A customer site can potentially have multiple sites created in Network Management if they want their players to be grouped.