The template is the foundation for the entire presentation. Every component that goes into the presentation needs precise placement and dimensions. The template is the starting point for creating this framework.
The template of your presentation is based on the resolution of the display, i.e., 1920x1080 landscape or 768x1360 portrait. Each area of the template, or zones as they are called in the software, have X and Y coordinates with dimension information about the images, text, and price components within the final presentation. This information is generally provided by an ad agency or your design department.
See Templates Strategies and Guidelines
See Navigating the Templates Tab
See Saving a Template as a Different File Name
![]()
Template Strategies and Guidelines
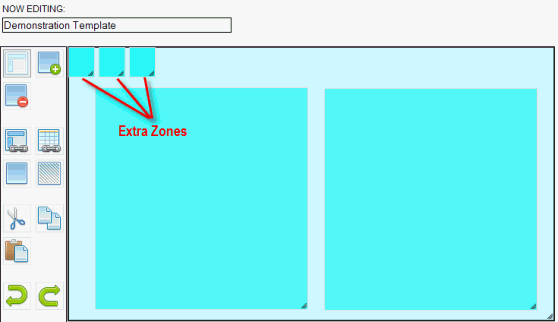
■ Once templates are being used in presentations, zones cannot be added or deleted from the template. It is recommended to build three or four extra zones, make them small, and tuck them in a corner of the template. If needed in the future, they can be resized and the Z-Index can be changed as well.
■ Use our recommended naming conventions for clarity and ease of searching in the future. See Template Naming Conventions.
■ Do not create a zone for every menu item line or pieces of information in your board. If your board will be using dynamic text and images (editable within the presentation), create larger zones for general areas of your board and use the Layout feature to create layout zones (Layout Item Details) for precise placement of text and images. See the Quick Fixing Example below for how to map out zones on your board.
■ Gain an understanding of the Z-Index in the Zone Properties. The Z-Index helps you layer images and text in the proper order. See Setting Zone Properties.
■ The zones are numbered in the order they are created.
■ Each zone displays the height and width in pixels. Use those dimensions to create the layout for that zone.

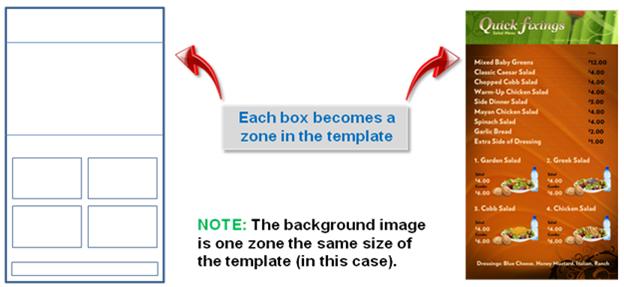
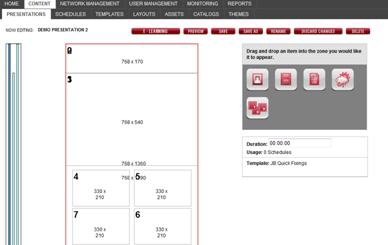
The following Quick Fixings image is an example of how areas of your board mock-up can become zones in which to build the layout of the text and images.
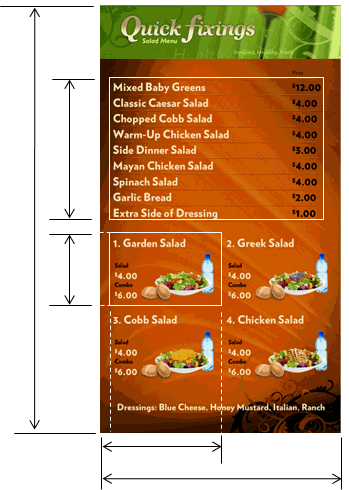
Notice that a zone is not created for every line in the menu. It is best to create larger areas rather than a zone for each piece of text or image. However, if you going to display multiple images that are not part of a custom layout, a zone needs to be created for each image.

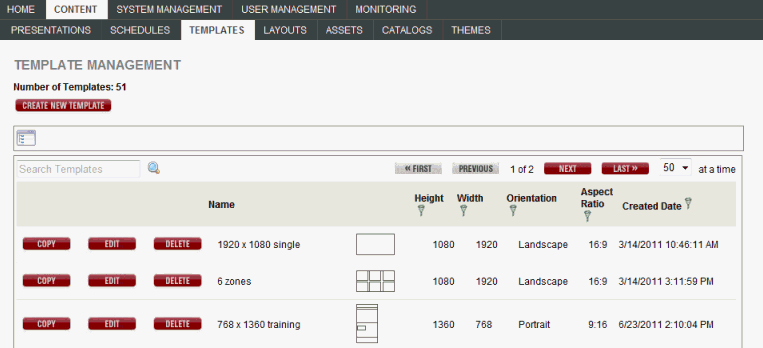
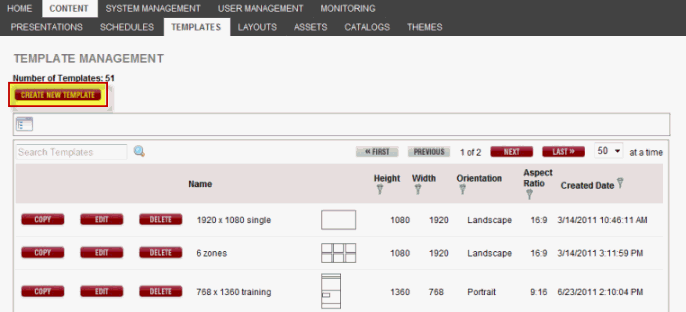
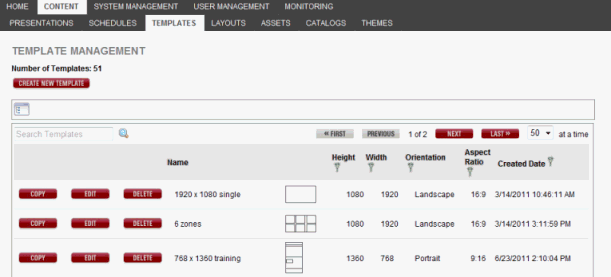
Click the Content/Templates tab to open the Template Management page. Any templates already created are listed here. To create your own template, see Creating a New Template.
In this window, you can do the following:
■ Click Create New Template to create a new template.
■ Click Copy to make a copy of the existing template and save under a different name.
■ Click Edit to make changes to the template.
■ Click Delete to permanently delete the template.
■ Search for a template by entering the file name or the first few characters in the Search field.
■ Click any column head to sort the templates in ascending or descending order by the information in the column.
For Example: To sort in ascending order by template name, click the Name column head. An up arrow appears next to the column head. If you click the column head again, a down arrow appears and the templates are sorted in descending order by name.
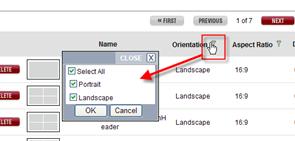
■ Click
a Filter icon ![]() to
open a list of options in that list to select or deselect and filter down
the list.
to
open a list of options in that list to select or deselect and filter down
the list.
Each tab under the Content
tab displays a Folder Navigator icon  providing
the opportunity to access the folders you have created in your RoninCast
system. See Using Folder Management
for information on creating new folders.
providing
the opportunity to access the folders you have created in your RoninCast
system. See Using Folder Management
for information on creating new folders.
To use the Folder Navigator:
1. Click the Folder Navigator icon . The
Root of the folders displays.

2. Click the arrow to expand the Root.
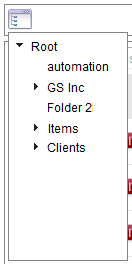
3. Select a folder. A drop-down list appears next to the Root drop-down box.

4. Click GO to open the list or to present another sub-folder drop-down list.
When creating a custom template, add the zones according to the board mockup and size them according to any dimensions provided. In a template that will use dynamic text and images, each zone is designed with a Layout (see Using Layout Management) which provides the framework for text and images.
|
Naming Convention Best Practices (Click to open) |
To create a new template:
1. Click Create New Template.
The following window appears:
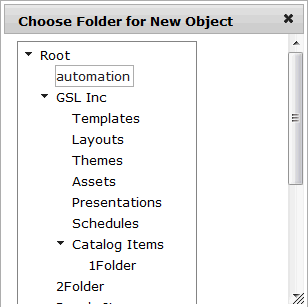
2. In the Choose Folder for New Object window, select a folder in which to place the new template. The template editor appears.
NOTE: For more information about Folder Management and creating new folders, go to Using Folder Management.
IMPORTANT: If a folder is not present under the Root, a folder will need to be created under Folder Management before an object can be created.
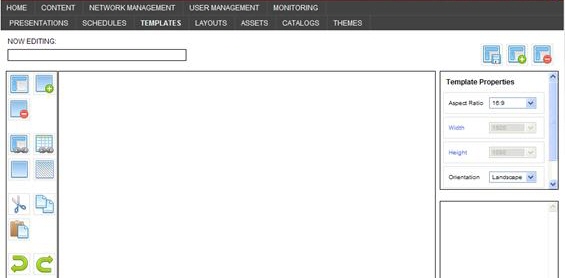
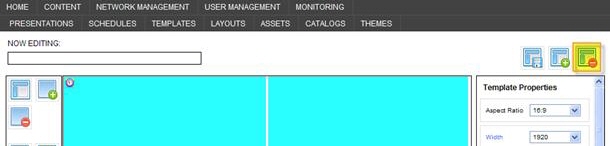
3. In the Now Editing field, enter a name for your template using the Naming Convention Best Practices.
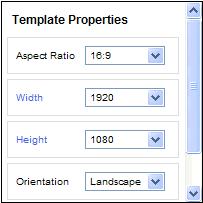
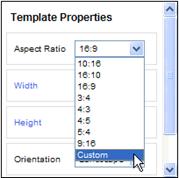
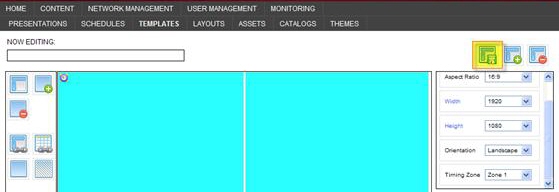
4. Set the Template Properties:
Aspect Ratio: Select the aspect ratio of the display on which the template will use. NOTE: An aspect ratio in this context is the relation between the width and the height displayed as the number of times the height is contained in the width, e.g., the ratio of 16:9. The Width and Height should be set according to the resolution of the display on which it will be played. Width: Desired width of the template in pixels. If you change this value, the height is changed automatically, based on the values for aspect ratio and orientation. Click the “Width” link to activate the drop-down list. Height: Desired height of the template in pixels. If you change this value, the width is changed automatically, based on the values for aspect ratio and orientation. Click the “Height” link to activate the drop-down list. |
|
Orientation: Select the orientation of the display on which the template will be used (landscape or portrait). This will be determined by the orientation of the display used to play your presentation. |
|
5. Add the zones and size them as appropriate. See Adding and Sizing Zones for more information.
NOTE: It is important to not create a zone for each line of text and image but to create zones for general areas of the presentation. You will use the Layout tool to design specific placement of text and images. See the Quick Fixing Example above.
6. Click the Save this template icon. The new template is added to the list in the Templates Management window. It will also be shown in the templates list when you create a new presentation.
To create custom sized templates, such as for a 2- or 4-board array, click the Aspect Ratio drop-down arrow under Template Properties and select “Custom.”
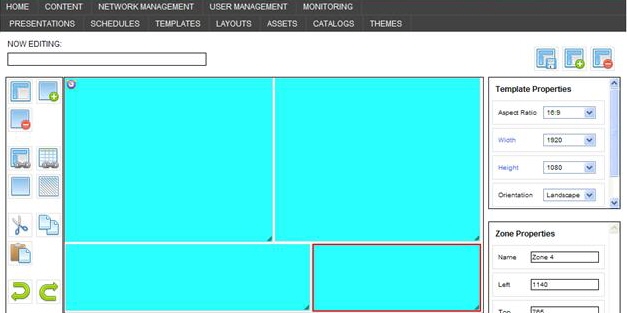
Every template is made up of zones and are added clicking the Add a new zone button and sized either manually or using the properties.
To add and size zones:
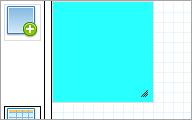
1. Add a zone by clicking the Add a new zone icon.
![]()
2. Size the zone by using one of the following methods:
a. Drag the right or bottom border or the lower right corner (Point to the border with the cursor. When the cursor is a double arrow, you can drag the border) to resize zone.
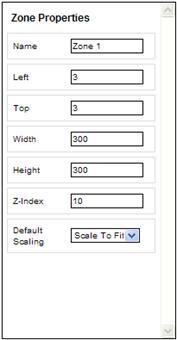
b. Use the Zone Properties to change the Width and Height of the zone, as well as the x and y position.
3. Reposition the zone by selecting and dragging or by using the Zone Properties to set the Top and Left position in the number of pixels.
4. To use optional methods of positioning zones more precisely, select the zone you want to use and then click Snap to Grid or Snap to neighboring zones.
■ Snap to Grid turns on the ability to snap the created zone to the gridline. When you draw, resize, or move a zone, it aligns or "snaps to" the closest intersection of lines in the grid.
■ Snap to neighboring zones turns on the ability to snap a zone directly adjacent to a neighboring zone.
■ Show/hide wire frames toggles on and off the blue filler in the zones. When wire frames are shown, the zones become transparent.
5. To copy a zone and paste it within the same template:
a. Select the zone to copy.
b. Click
the Copy icon ![]() .
.
c. Click
the Paste icon ![]() .
The pasted zone appears on top of the copied zone. Drag it to where you
want it and resize it, if needed. You also can use the Zone
Properties to change the x and y coordinates of the zone.
.
The pasted zone appears on top of the copied zone. Drag it to where you
want it and resize it, if needed. You also can use the Zone
Properties to change the x and y coordinates of the zone.
6. Set the zone properties on each zone. See Setting Zone Properties.
IMPORTANT: Once
the template has been used in a presentation, you cannot add or delete
zones to the template. To accommodate possible future expansion of the
template, add three or four zones to the template and make them small.
They can be tucked down in a corner of the template and will not affect
the boards when assembled.
Leave the Z-Index
set at "10" so that they do not become hidden behind another
zone.
You can resize these zones and change the Z-Index when they are needed
in the future.
Click a zone to edit the following properties:
NOTE: The following fields are entered automatically, based on the current placement and size of the zone. You can edit them to change the zone placement and size.
Name: Enter a brief zone name. In the Left, Top, Width, and Height fields, you can enter an exact number of pixels to place and size the zone. Left: Placement of zone in number of pixels from left border. Top: Placement of zone in number of pixels from top border. Width: Desired width of the zone in pixels. Height: Desired height of the zone in pixels. Z-Index: Indicates the stacking order of overlapping zones. A zone with a higher Z-index will be in front of a zone with a lower Z-index.
NOTE:
For more information on how the Default Scaling: Keep the Default Scaling as is. |
|

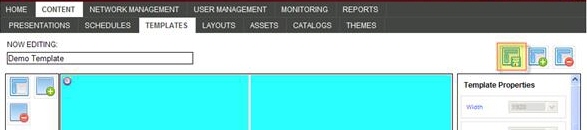
When the Quick Fixings template is complete, it will look like the following image.
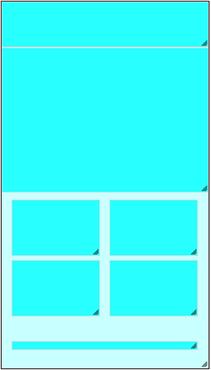
NOTE: The color of light blue in the background indicates the Z-Index was set at a lower number which moves it to the background. The darker blue is a higher Z-Index meaning it is closer to you.
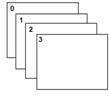
When the presentation is created, the zones are empty and numbered in the order they were created.

When the new template is saved, it is added to the list of templates in the Template Management window. It is also added to the list of templates you can choose from when you create a new Presentation.
1. Click the Save this Template icon.
The following window appears:
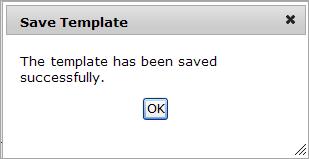
2. Click OK to close the window.
The saved template is available to select in the list of templates when you create a new presentation. Create the presentation using the steps in Creating a New Presentation. Each created template can be used multiple times in different presentations.
Click Edit for the template you want to change.
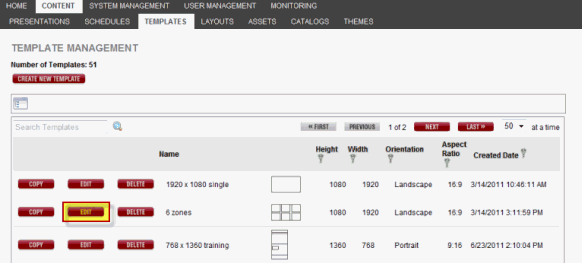
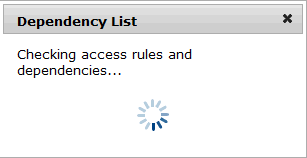
The system processes the access rules and dependencies.
It checks if your access settings include viewing, updating, or deleting the selected template. If you are not permitted to open this template, a message will appear stating such and the template will not open.
It also checks where this template is currently being used. If it is being used, the following window appears with either the Presentations tab alone or both the Schedules and Presentations tabs, depending on if the presentation using the template has been placed in a schedule.
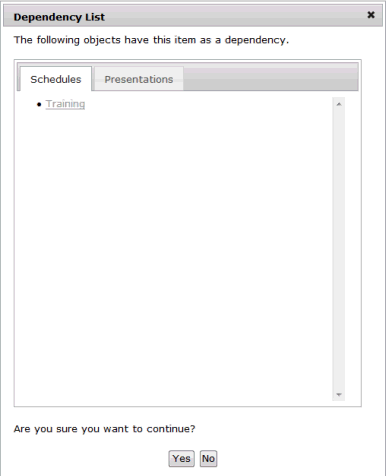
Each tab will list all of the items that would be affected if the template was edited in any way. All presentations listed in the Presentations tab of the Dependency List have a Preview button which opens a preview of the presentation without leaving the page.
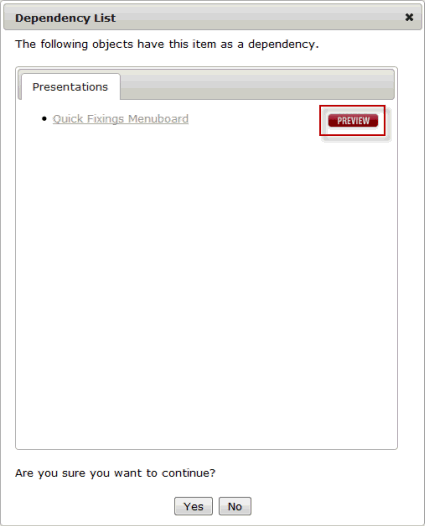
If you are sure that this template can be viewed and/or edited, click Yes and the Template Editor will open.
See Creating a New Template for more information about changing the zones in the template.
IMPORTANT: If you are using a template in a current presentation, you cannot add or delete zones to the template.
Saving a Template as a Different File Name
To copy a template and give it a different name:
1. In the template editor, select the Save template as icon.
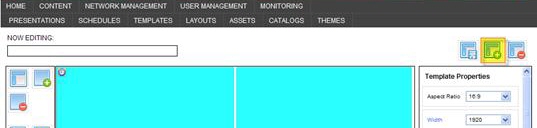
The following window appears:
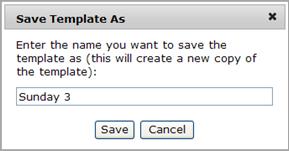
2. The Save Template As name defaults to the current name with an incremental number after it. You can change this name.
3. Click Save to save the new template.
Click Delete for the template you want to delete. A confirmation message appears to verify that you want to delete it. You can delete a template from either of the following:
The Template Management Window
The Template Editor
If the template is in use you may see the following message:
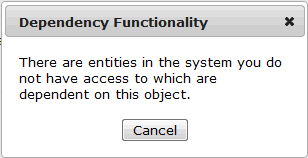
If this message appears, you will not be able to delete the template.
If you have created a template that contains the same or similar specifications as a new project, you can save time by copying and renaming it rather than creating a new template from scratch.
1. In the Template Management window, select the Copy button next to the template Name.
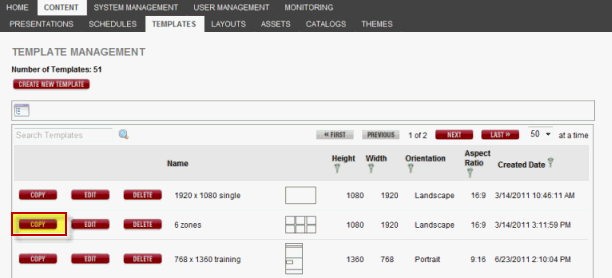
The following window appears:
2. In the Choose Folder for New Object window, select a folder in which to place the new template.
The following window appears:
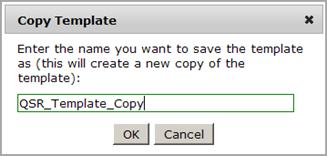
3. Enter a name for the copy.
4. Click OK to create the copy.